Mummy Brie Crescent Roll Recipe: Easy Halloween Party Appetizer!

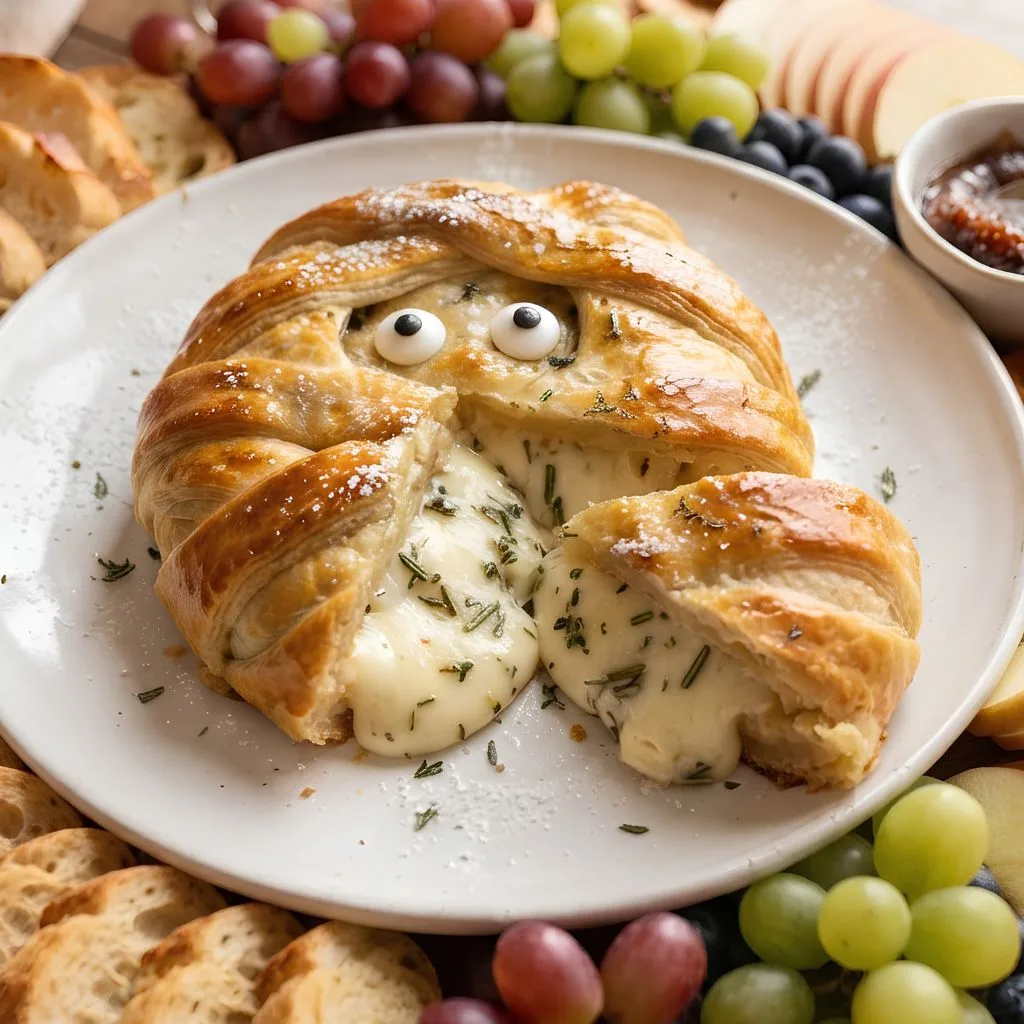
I made this Mummy Brie Crescent Roll Recipe when I wanted a Halloween appetizer that looked impressive without spending hours in the kitchen. I loved how a simple wheel of Brie and refrigerated crescent dough turned into a fun little edible mummy.
The warm Brie became soft and bubbly while the crescent strips baked into a golden wrapper. I served mine with fruit, bread, jam, and a few snack-board favorites for an easy grazing spread. If you want a quick Halloween appetizer with plenty of personality, this recipe is a fun one to try.

Cooking Time
This recipe is designed to be quick enough for a last-minute Halloween gathering.
- Prep Time: 15 minutes
- Cooking Time: 15 minutes
- Total Time: 30 minutes
- Servings: 8
Ingredients
The ingredient list is simple, and most items are easy to find at a regular grocery store.
- 8 ounces Brie wheel — This is the creamy center of the appetizer; keep the wheel whole for easier wrapping.
- 1 can refrigerate pre-made crescent rolls — Use refrigerated dough so it is flexible enough to cut and wrap.
- 1 egg yolk + 1 tablespoon water — Optional egg wash that helps the dough develop a golden, crisp finish.
- Salami, prosciutto, olives, gherkin pickles, dried apricots or figs, and nuts — Optional board additions for extra variety.
- 1 jar cherry, raspberry, apricot, fig, or blueberry jam — A sweet dip that pairs especially well with warm Brie.
- 2 apples, sliced into wedges — Crisp fruit adds a fresh contrast to the creamy cheese.
- Sweet table grapes — These add natural sweetness and make the grazing board colorful.
- 1 package fresh blueberries — Fresh berries bring color and a juicy bite to the platter.
- 1 French baguette, sliced — Great for scooping up the melted Brie and jam.
- 2 candy monster eyes — Place them on the baked mummy for the Halloween look.
Note: serves several — this quantity makes about 8 servings.
Equipment You Need
A few basic kitchen tools are enough to assemble and bake this Halloween appetizer.
- Large cutting board — Gives you a flat surface for pressing and cutting the crescent dough.
- Sharp knife — Helps you create long, narrow dough strips.
- Baking sheet — Holds the wrapped Brie while it bakes.
- Parchment paper — Lines the baking sheet and makes cleanup easier.
How to Make Mummy Brie Crescent Roll Recipe?
The best part of this recipe is how little preparation it requires.
I simply shape the refrigerated dough, wrap the Brie, and bake it until the cheese is bubbly.
The final step is adding the eyes and arranging everything around the warm mummy.
1. Preheat the Oven
I start by preheating the oven to 375°F so it is ready when the wrapped Brie is assembled. Having the oven hot before baking helps the crescent dough cook properly and become golden.
While it heats, I prepare the dough and Brie.
2. Prepare the Crescent Dough
I unroll the refrigerated crescent dough onto a large cutting board or clean work surface. Then I gently press the dough pieces together to create one larger sheet with fewer seams. This makes it easier to cut long strips for the mummy wrapping.

3. Cut the Dough Into Strips
Using a sharp knife, I cut the dough into long, thin strips about one-third of an inch wide. Each strip needs to be long enough to travel around the Brie and meet at the back. If a strip does not stick when the ends meet, a few drops of warm water can help connect it.

4. Start Wrapping the Brie
I place the Brie wheel on my work surface and begin wrapping it with the crescent strips. I change the direction of the strips as I go so the cheese looks more like a wrapped mummy. I connect the ends at the back and leave a small opening near the top for the eyes.
5. Add the Optional Egg Wash
For a more golden-looking crust, I whisk together one egg yolk and one tablespoon of water. I lightly brush the mixture over the exposed crescent dough before baking. This step is optional, but it gives the baked dough a more polished finish.
6. Bake the Mummy Brie
I line a baking sheet with parchment paper and place the wrapped Brie in the center. Then I bake it at 375°F for about 15 minutes, watching for golden, cooked-through dough. The Brie should be bubbly when it comes out of the oven.
7. Add the Mummy Eyes
As soon as the Brie comes out of the oven, I add the two candy monster eyes to the top. I make sure there is enough open space in the dough wrapping for the eyes to be visible. For an alternative, raisins, dried cherries, dried cranberries, or sliced black olives can be used.
8. Build the Grazing Board
I place the warm mummy Brie in the center of a large cutting board or charcuterie-style serving board. Then I spoon cherry, raspberry, apricot, fig, or blueberry jam into a small serving dish nearby. I arrange apples, grapes, blueberries, baguette slices, and optional savory snacks around the Brie.
9. Serve While Warm
I like to serve the mummy Brie immediately while the cheese is soft and warm. Guests can spread the melted Brie onto crusty baguette slices or pair it with fruit and jam. Any leftovers should be placed in an airtight container and refrigerated.
Additional Tips for Making This Recipe Better
After making this recipe, these are the little details I would pay attention to for the best presentation and easiest preparation.
- I keep the crescent dough refrigerated until I am ready to use it because cool dough is easier to handle and shape.
- I press the dough seams together well before cutting so my strips hold their shape during wrapping.
- I leave a deliberate opening for the eyes instead of covering the entire Brie with dough.
- I vary the direction of each dough strip because the uneven wrapping gives the mummy more character.
- I use the egg wash when I want a more golden-looking crust.
- I keep the jam in a separate small dish on the board so guests can choose how much sweetness they want.
- I arrange the fruit and baguette around the Brie only after baking so the board looks fresh and colorful.
- I would not overload the Brie with jam before baking because too much can ooze out during cooking.
Common Mistakes to Avoid
A few small mistakes can make this easy appetizer harder to assemble than it needs to be.
- Using strips that are too short: I make each strip long enough to wrap around the Brie and meet at the back.
- Covering the entire top: I leave a small opening so the mummy eyes remain visible.
- Overloading with jam: I use only a few teaspoons if adding jam inside the Brie because too much may leak during baking.
- Skipping the dough connection: I press the strip ends together firmly, using a few drops of warm water if needed.
- Overbaking the Brie: I start checking around the 15-minute mark and look for golden dough and bubbly cheese.
How to Serve Mummy Brie Crescent Roll Recipe?
Presentation is what makes this appetizer especially fun for Halloween.
I like to make the mummy the centerpiece and build the rest of the board around it.
The contrast of creamy Brie, colorful fruit, golden dough, and dark Halloween-style eyes creates an inviting display.
Place the baked mummy Brie in the middle of a large cutting board or charcuterie board. Add a small bowl of cherry, raspberry, apricot, fig, or blueberry jam beside it. Arrange apple wedges, grapes, blueberries, and sliced French baguette around the cheese.
For a fuller grazing board, add salami, prosciutto, olives, gherkin pickles, dried apricots, figs, almonds, walnuts, or pecans. The result works beautifully as one of those easy mummy appetizers that doubles as edible Halloween decoration.

Variations
The original recipe offers several simple ways to change the presentation or flavor without complicating the preparation.
- Puff pastry version: I can replace the crescent dough with thawed puff pastry and follow the puff pastry package’s baking instructions.
- Different jam: I can use cherry, raspberry, apricot, fig, or blueberry jam depending on the flavor combination I want.
- Different mummy eyes: Raisins, dried cherries, dried cranberries, or sliced black olives can replace candy monster eyes.
- Jam-filled Brie: I can remove the top white rind, spread a few teaspoons of jam over the cheese, replace the rind, and then wrap it.
- Extra grazing-board flavors: I can add prosciutto, salami, pickles, olives, dried fruit, almonds, walnuts, or pecans around the centerpiece.
- Halloween puff pastry idea: Using puff pastry instead of crescent dough creates a variation that fits naturally with other Halloween puff pastry recipes.
The supplied source does not provide specific dairy-free or sugar-free substitutions, so those changes would require separate recipe testing rather than being treated as part of the original recipe.
Nutritional Information
The source recipe provides the following nutrition estimate per serving, based on 8 servings.
- Calories: 403
- Protein: 15g
- Carbohydrates: 48g
- Fat: 17g
These figures come from the original recipe’s stated nutrition information and can vary depending on the exact brands and optional ingredients used.
Make Ahead and Storage
Make Ahead
I would prepare the dough strips and have the serving-board ingredients ready shortly before baking. Because the Brie is best when warm and bubbly, the final baking step is best done close to serving time.
Refrigerating Leftovers
After serving, I place leftover Brie in an airtight container and refrigerate it. The original recipe specifically recommends refrigerating leftover Brie in an airtight container.
Reheating
I prefer to warm leftovers gently before serving again so the Brie can soften. Because the source recipe does not give a specific reheating temperature or time, I would avoid treating a particular reheating method as part of the original instructions.
Freezing
The supplied recipe does not provide tested freezing instructions for the completed mummy Brie. For that reason, I would not recommend a specific freezing time or method without additional testing.
Why You’ll Love This Recipe?
This recipe combines a simple preparation with a playful Halloween presentation.
I especially like that it can become both an appetizer and the centerpiece of a casual grazing board.
- It is quick to prepare: I only need about 15 minutes of preparation before the Brie goes into the oven.
- It looks much harder than it is: I use ready-made refrigerated crescent dough instead of making pastry from scratch.
- It works for Halloween parties: The mummy shape and monster eyes make an ordinary baked Brie feel festive and fun.
- It is easy to customize: I can change the jam, eyes, fruit, and grazing-board additions while keeping the basic recipe the same.
- It fits a grazing board: I can surround the warm Brie with baguette, apples, grapes, blueberries, and optional savory snacks for a complete appetizer spread.
FAQs
Can I use puff pastry instead of crescent roll dough?
Yes. The original recipe suggests using thawed puff pastry as an alternative to crescent dough. Follow the puff pastry package’s baking instructions.
What can I use instead of candy monster eyes?
Raisins, dried cherries, dried cranberries, or sliced black olives can work as alternative mummy eyes. Add them after baking.
Can I put jam inside the Brie?
Yes. You can remove the top white rind, spread a few teaspoons of jam over the cheese, replace the rind, and then wrap the Brie. Avoid using too much because it may ooze out while baking.
What temperature should I bake Mummy Brie?
Bake the crescent-wrapped Brie at 375°F for about 15 minutes, or until the dough is golden and cooked through and the cheese is bubbly.
How should I serve leftover Mummy Brie?
Place leftover Brie in an airtight container and refrigerate it. The recipe is best served warm, so gently warming leftovers before serving can help restore the soft cheese texture.