The Best Cheese Ball Recipe Ever (Creamy Bacon Ranch Party Hit)

I made this Cheese Ball Recipe for a holiday get-together, and I was stunned by how fast it disappeared. It tastes creamy, tangy, smoky, and savory all at once. I mixed it in about ten minutes and let the fridge do the rest. Since that day, I have made it for parties, game nights, and quiet snack nights at home. If you want a simple cheese ball recipe that never fails, this is the one I trust.

Cooking Time
This recipe needs no oven time. Most of the wait is chilling, so plan ahead.
- Prep Time: 10 minutes
- Cooking Time: 0 minutes (just pre-cook your bacon)
- Total Time: 4 hours 10 minutes (includes chilling)
Cheese Ball Ingredients
Only six ingredients go into this cheese ball recipe with cream cheese. Each one has a clear job, so don’t swap them out without a plan.
- 16 oz cream cheese (full-fat block, softened): Gives the smooth, creamy base, and low-fat versions turn out less rich.
- 1 3/4 cups shredded cheddar cheese: Grate it fresh for better melt-in-your-mouth texture and flavor.
- 1 (1 oz) packet ranch dressing mix: This is the signature flavor, so start with half if you like less salt.
- 3 tablespoons sour cream: Loosens the mixture a little and adds a pleasant tang.
- 5 slices bacon, cooked and crumbled: Brings smoky, salty crunch, so cook it crisp and cool it first.
- 2–3 tablespoons chopped green onion: Adds mild freshness that balances the rich cheese.
Note: Serves several, about 24 small servings of 2 tablespoons each.
Equipment You Need
You probably own everything on this list already. Nothing here is fancy.
- Large mixing bowl: Holds and combines all the ingredients.
- Silicone spatula: Folds the mixture smoothly and scrapes the bowl clean.
- Plastic wrap: Helps shape the ball and keeps it fresh in the fridge.
- Small bowl: Supports the wrap so the ball keeps a round shape while you work.
- Serving plate: Gives the finished cheese ball a nice, sturdy home on the table.
How to Make Cheese Ball Recipe?
This cheese ball is almost impossible to mess up. You stir, shape, chill, and serve. Follow the steps below, and you will have a party-ready appetizer without any stress.
Soften the Cream Cheese
Take the cream cheese out of the fridge about an hour before you start. Soft cream cheese blends without lumps and saves your arm a workout. Cold cheese leaves white streaks and makes the mix feel heavy.
Cook and Crumble the Bacon
Cook five slices of bacon until crisp, then drain them on paper towels. Let them cool fully, then crumble into small bits. Warm bacon would melt into the cheese and turn the mix greasy.
Mix Everything Together
Add the cream cheese, cheddar, ranch mix, sour cream, bacon, and green onion to a large bowl. Stir with a spatula until the mixture looks smooth and evenly blended. Make sure no big chunks of cream cheese remain.
Line a Bowl With Plastic Wrap
Lay a big sheet of plastic wrap inside a small bowl. The bowl acts like a mold and keeps your cheese ball nicely rounded. Leave extra wrap hanging over the edges so you can wrap it up easily.
Shape the Ball
Scoop the cheese mixture into the wrap-lined bowl. Pull the edges of the wrap up and around the cheese, then gently press it into a ball. This keeps your hands clean and the shape tidy.
Chill for at Least 4 Hours
Keep the cheese ball wrapped and place it in the fridge for at least four hours. This rest time lets the flavors blend and the cheese firm up. For the best taste, I like to chill it overnight.
Unwrap and Serve
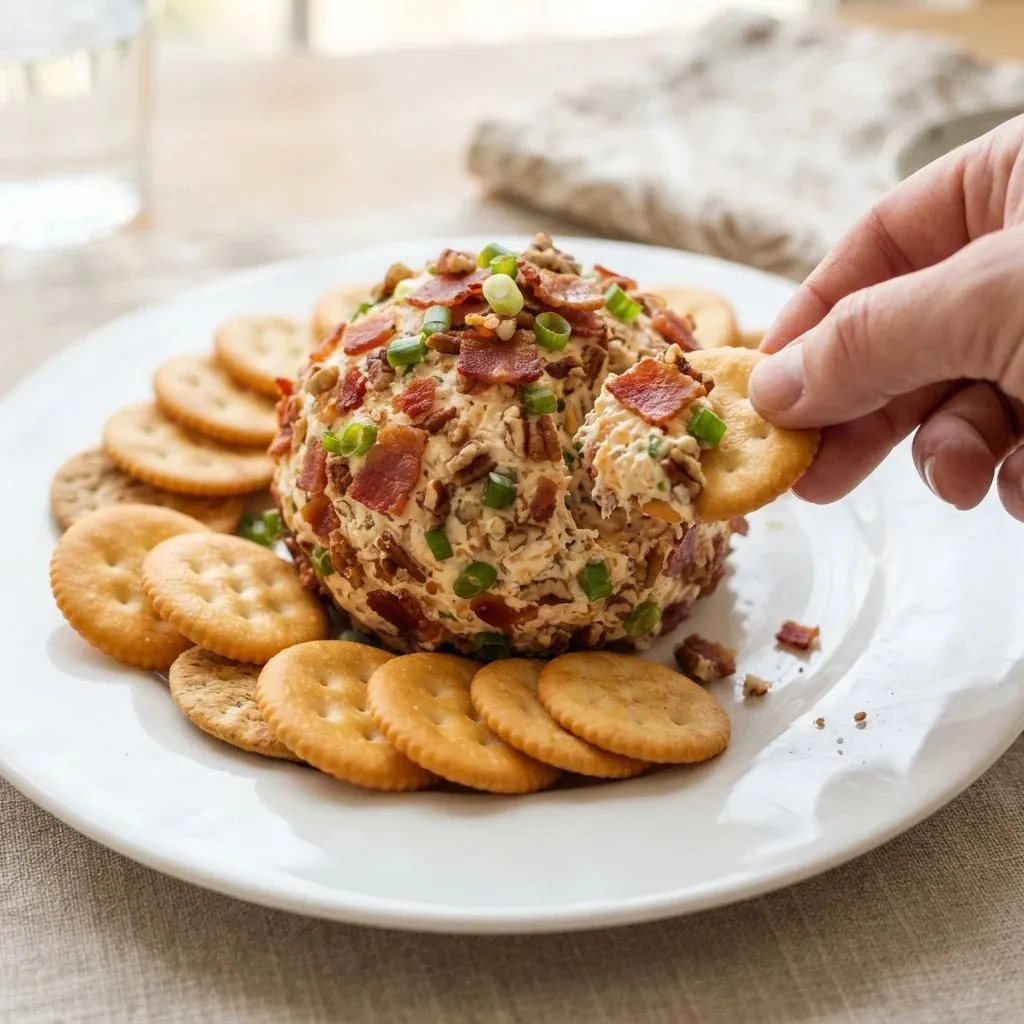
When you are ready to serve, unwrap the cheese ball and set it on a plate. Roll it in crushed nuts, extra bacon, or fresh herbs if you want a finishing touch. Add a knife and plenty of crackers.
Additional Tips for Making This Recipe Better
I have made this recipe many times, and a few small habits make a big difference. These are the tips I use every single time.
- I always soften the cream cheese first, because it makes mixing smooth and quick.
- I never skip the chill time. Four hours works, but overnight gives me the best flavor.
- I taste my ranch mix before adding it. Some brands are saltier, so I sometimes start with half the packet.
- I stir just until everything is combined. Overmixing makes the mix too soft to shape.
- I let the cheese ball sit out for about 15 minutes before serving. It spreads much easier then.
- I roll it in finely chopped chives or parsley right before serving. It adds color and helps crackers grip.
- If the mixture feels too soft to shape, I chill it for 20–30 minutes first. Then it holds together nicely.
- I use block cream cheese, like the kind in a Philadelphia-style brick, because it holds its shape far better than whipped tubs.
- I grate my own cheddar whenever I have time. Fresh shreds blend more smoothly than the bagged kind.
- I double the bacon when I am feeding true bacon lovers. It adds even more smoky flavor and crunch.
Common Mistakes to Avoid
Even an easy cheese ball recipe has a few traps. Here are the slip-ups I have run into myself.
- I once used cold cream cheese, and the mix came out lumpy. Always soften it first.
- I tried low-fat cream cheese once, and the texture felt thin and bland. Use full-fat for the best result.
- I added the whole ranch packet without tasting, and it turned out too salty. Start small and adjust.
- I rushed the chilling once, and my ball slumped on the plate. Give it at least four hours.
- I mixed in warm bacon one time, and the whole bowl turned greasy. Let it cool completely first.
How to Serve Cheese Ball?
A good cheese ball deserves a pretty spot on the table. A few simple touches make it look like a party centerpiece.
- Place it in the middle of a large platter and surround it with crackers, pretzels, and chips.
- Add crunchy veggies like celery, carrots, and bell pepper strips for a fresher option.
- Roll the ball in chopped pecans, bacon crumbs, or fresh herbs for color and texture.
- Sprinkle a little chopped green onion on top for a bright, fresh finish.
- Set out a small knife so guests can spread it easily.
- For a big crowd, make two cheese balls or a few smaller ones so they are easy to grab.

Variations
There are so many different cheese ball recipes out there, and this base works with almost all of them. Try one of these twists to make it your own.
- Spicy kick: Add diced jalapeños, red pepper flakes, or a dash of hot sauce.
- Herb lover’s version: Stir in parsley, dill, or chives for a fresh, bright flavor.
- Nutty coating: Roll the ball in chopped pecans, walnuts, or almonds for crunch.
- Sweet and savory: Mix in dried cranberries or apricots for a pop of sweetness.
- Mexican-inspired: Use taco seasoning, pepper jack cheese, and cilantro.
- Vegetarian: Skip the bacon and add extra green onion or chopped nuts.
- Nut-free coating: Roll it in everything seasoning instead of nuts.
- Dried fruit or meat mix-ins: Fold in a little crushed pineapple or chopped dried beef, if you like old fashioned flavors.
Nutritional Information
Here are the estimated nutrition facts for one serving of 2 tablespoons. The numbers are approximate and can change with your brands.
- Calories: 104 kcal
- Protein: 3 g
- Carbohydrates: 1 g
- Fat: 10 g
Make Ahead and Storage
This is a great make-ahead appetizer, and the flavor improves with time. Here is how I store it.
Make Ahead
You can prepare the cheese ball up to 2 days before your event. Wrap it tightly in plastic and keep it in the fridge. Add any coating just before serving so it stays fresh and crunchy.
Storage
Store leftovers wrapped in plastic or in an airtight container. They stay fresh in the fridge for up to 5 days, including any make-ahead days. If the outside gets soft, roll it in fresh nuts or bacon again.
Freezing
The original recipe does not recommend freezing. The cheese changes texture after thawing and can turn crumbly. I prefer to enjoy it fresh, so I make smaller batches instead.
Reheating
You do not need to reheat this recipe, because it is served cold. Just let it sit on the counter for about 15 minutes before serving. This softens it slightly and brings out the flavor.
Why You’ll Love This Recipe?
This cheese ball has a lot going for it. Here is why it keeps earning a spot at my table.
- Super easy to make: Only six ingredients and about 10 minutes of hands-on time. You mix, shape, and chill, and that is it.
- Perfect make-ahead appetizer: It tastes better after chilling, so you can prep it the night before. That means less stress when guests arrive.
- Great for any occasion: It fits holidays, potlucks, baby showers, and game day. It always looks and tastes like a crowd favorite.
- Easy to customize: Change the coating, add spice, or leave out the bacon. The recipe is very forgiving.
- Budget-friendly and filling: A small scoop goes a long way, and it feeds a crowd. Pair it with crackers and veggies and you have a full snack spread.
FAQs
How long does a cheese ball last in the fridge?
It stays fresh for up to 5 days when wrapped tightly or stored in an airtight container.
Can I make this cheese ball without bacon?
Yes, it works well without bacon. Add extra green onion or chopped nuts for flavor and texture.
What if my cheese ball is too soft to shape?
Chill the mixture for 20–30 minutes first. It will firm up and be much easier to handle.
Can I make a cheese ball without cream cheese?
This recipe depends on cream cheese for its creamy base and its shape. I would not skip it, since the ball would not hold together.
How many people does one cheese ball serve?
One batch makes about 24 small servings of 2 tablespoons each. For a big crowd, I make two cheese balls.