Easy Pizza Skull Recipe: A Spooky, Cheesy Halloween Favorite

I love recipes that look complicated but are surprisingly easy once I get started, and these Pizza Skulls are exactly that kind of treat. When I make them, I use ready-made pizza dough, sauce, cheese, and my favorite toppings to keep everything simple.
The skull-shaped pan does most of the visual work, turning ordinary pizza ingredients into a fun Halloween centerpiece. I especially like the freshly shredded mozzarella because it melts into a wonderfully gooey filling. Whether I serve them as an appetizer, dinner, or party snack, these cheesy pizza skulls always make the table feel festive.

Cooking Time
These stuffed Pizza Skulls take about 50 minutes from preparation to serving, including the chilling time before baking. The original recipe lists 30 minutes of prep and 20 minutes of cooking.
- Prep Time: 30 minutes
- Cooking Time: 20 minutes
- Total Time: 50 minutes
Ingredients
The quantities below follow the six-serving recipe from the source. The recipe uses a skull pan, pizza dough, sauce, toppings, mozzarella, and a simple egg wash.
- 1½ tablespoons melted butter — Use it to grease the skull pan thoroughly so the dough releases easily.
- 3 rolls Pillsbury Pizza Dough, or 33 ounces homemade pizza dough — Store-bought dough keeps this recipe quick and convenient.
- 9 tablespoons pizza sauce — Choose your favorite jarred sauce for an easy filling.
- ¾ cup pizza toppings — Mini pepperoni, sausage, ham, pineapple, mushrooms, or vegetables all work.
- 2 cups shredded mozzarella cheese — I recommend shredding mozzarella fresh because it melts better than pre-shredded cheese.
- 1 egg mixed with 1 teaspoon water — This egg wash helps seal the dough and gives the crust a finished appearance.
Note: serves several — approximately 6 servings.
Equipment You Need
- Skull pan — Shapes the stuffed pizza into detailed skulls; a six-cavity Nordic Ware pan or the Wilton skull pan can be used.
- Pastry brush — Helps spread melted butter over the pan and egg wash over the dough.
- Kitchen shears or knife — Makes trimming excess pizza dough much easier.
- Mixing bowl — Useful for preparing the egg wash.
- Oven — Bakes the filled skulls until the crust is cooked through and golden.

How to Make an Easy Pizza Skull Recipe?
Making pizza skulls is mostly about layering, sealing, chilling, and baking. I find it easiest to prepare all the fillings before putting the dough into the pan. The most important step is sealing the dough well so the sauce and melted cheese stay inside.
Grease the Skull Pan
Start by generously greasing the inside of each skull cavity with melted butter or baking spray. Make sure you cover the detailed areas of the mold because the dough needs to release cleanly after baking. For a six-cavity Nordic Ware pan, grease all six cavities; for the Wilton version, grease each available skull cavity.
Prepare the Pizza Dough
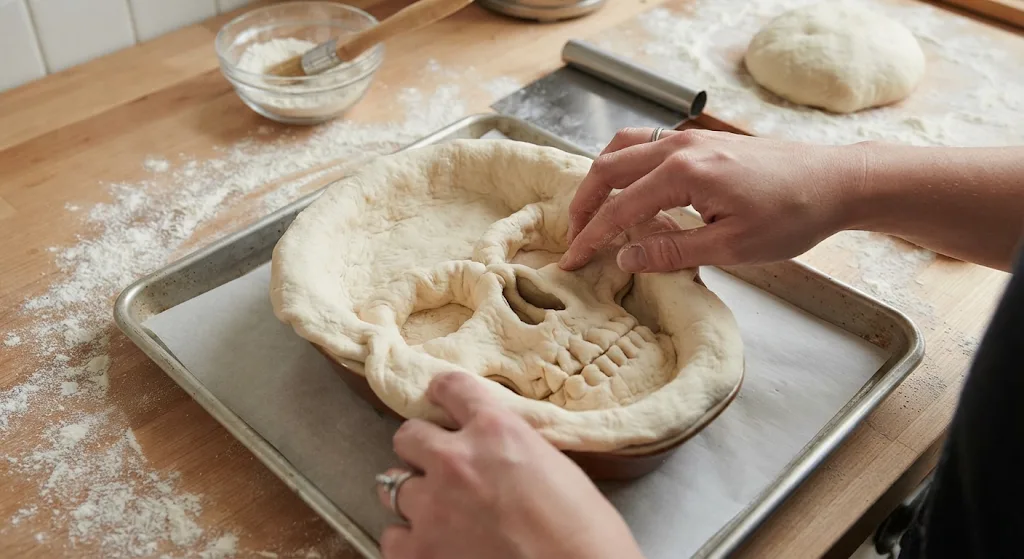
Cut each roll or sheet of pizza dough in half as directed in the original recipe. Take one portion and gently drape it into a skull cavity, pressing it into the shape without stretching it too thin. Leave enough dough extending over the opening so you can fold it over the filling later.
Add the Sauce and Toppings
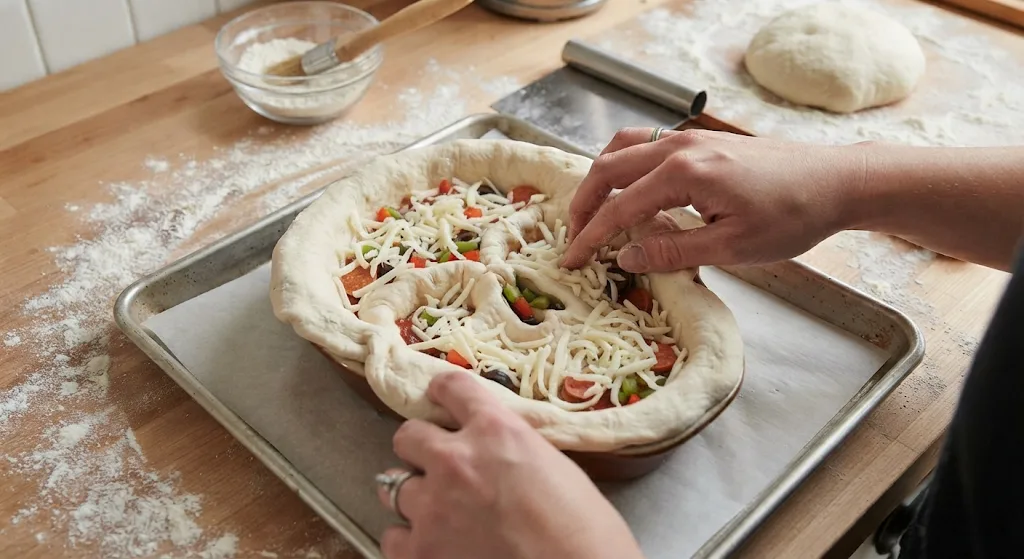
Add pizza sauce, your selected toppings, and shredded mozzarella inside the dough-lined cavity. The original recipe lists about 2 tablespoons of sauce, 2 tablespoons of toppings, and ⅓ cup of cheese per skull for the six-skull version. Avoid overfilling because excess filling can make sealing the dough difficult and may cause the filling to escape.
Fold and Seal the Dough
Fold the excess dough over the filling until the opening is covered. Trim away extra dough, then pinch the seams together carefully to create a secure seal. I would pay extra attention to the edges because a good seal helps keep the warm sauce and melted cheese inside the skull.
Brush with Egg Wash
Mix one egg with one teaspoon of water to create the egg wash. Brush it over the exposed dough, paying particular attention to the seams where the dough was pinched together. This step helps reinforce the sealed crust before the skulls go into the refrigerator.
Chill the Pizza Skulls
Place the filled and sealed pan in the refrigerator for 30 minutes. While the skulls chill, preheat the oven to 375°F so it is ready when the dough comes out. The chilling step is part of the original method and gives you time to get the oven and serving area ready.
Bake the Skull Pizzas
Bake the skulls until the crust is cooked through and golden brown. The Wilton pan version takes about 18–20 minutes, while the larger Nordic Ware skulls take approximately 28–30 minutes. Keep an eye on the faces because the dough touching the pan can brown faster, so I would avoid baking them longer than necessary.
Remove and Serve
Carefully turn the pan over and allow the baked skulls to release onto a clean counter or serving surface. Handle them gently because the crust and hot filling will be delicate immediately after baking. The original recipe recommends serving the Pizza Skulls immediately for the best experience.
Additional Tips for Making This Recipe Better
I like keeping these pizza skulls simple because the pan already makes them special. A few small details can make the process smoother.
- I would shred the mozzarella myself because the source specifically recommends fresh shredding for better melting.
- I would grease every detailed part of the skull cavities instead of only brushing the flat surfaces.
- I would keep the filling slightly below the rim so I have enough dough available to close the skull securely.
- I would chill the assembled skulls for the full 30 minutes because that is part of the original preparation method.
- I would watch the baking time closely, especially with the smaller pan, because the skull faces can brown before the rest of the crust.
- I would use leftover dough scraps for small cheesy snacks rather than throwing them away.
Common Mistakes to Avoid
These are the problems I would watch for when making the recipe.
- Overfilling the skulls: I would resist adding extra sauce or toppings because the source specifically warns against overfilling.
- Using poorly sealed seams: I would pinch the dough firmly and brush the seams with egg wash so the filling stays contained.
- Skipping the pan grease: I would grease the mold thoroughly to reduce sticking during unmolding.
- Overbaking: I would check the crust early because the skull faces can become darker from direct contact with the pan.
- Using pre-shredded mozzarella: I would grate the cheese fresh for a smoother melt, as recommended by the original recipe.
How to Serve Easy Pizza Skull Recipe?
Pizza Skulls are especially fun when served as a Halloween appetizer or themed dinner. The original recipe also notes that they have been used for Halloween and other spooky-themed gatherings. For presentation, place the skulls on a dark serving platter so their detailed faces stand out. Serve them whole so guests can see the skull shape before cutting or pulling them apart.
I would serve warm pizza sauce on the side for dipping and arrange the skulls with a few of the same toppings used inside. For a party, place several skulls together on a large platter and let guests choose their favorite filling.
If you’re searching online for pizza skulls near me, pizza skulls restaurant, or pizza skulls where to buy, remember that this recipe gives you a way to create the same spooky concept at home using a skull pan.

Variations
The original recipe encourages using different pizza toppings, so these skulls are easy to customize.
- Classic Pepperoni: Use mini pepperoni for the original-style filling.
- Ham and Pineapple: Combine ham and pineapple for a sweet-and-savory pizza variation.
- Meat Lover’s: Try sausage, hamburger, or chicken as alternative meat fillings.
- Vegetable: Add mushrooms, peppers, onions, roasted red peppers, artichokes, or other favorite vegetables.
- Cheese-Focused: Increase the cheesy character with mozzarella while keeping the filling amount controlled.
- Homemade Dough: Replace store-bought dough with homemade pizza dough if you prefer making the crust yourself.
- Dairy-Free: For a dairy-free adaptation, use a suitable dairy-free pizza cheese and check the dough and other packaged ingredients for dairy.
- Different Pan: Use the Wilton skull pan or Nordic Ware six-cavity skull pan, adjusting quantities and baking time according to the pan size.
Nutritional Information
The source recipe provides calorie information but does not list individual protein, carbohydrate, or fat values. The calorie figure is therefore the only nutritional number reported directly by the source.
- Calories: 520 kcal per serving
- Protein: Not provided in the source
- Carbohydrates: Not provided in the source
- Fat: Not provided in the source
Make Ahead and Storage
Refrigerating
I can prepare these ahead and keep the baked Pizza Skulls refrigerated for up to 3 days.
The source notes that they are best served the day they are made, but they can be baked ahead for a party.
Keep leftovers refrigerated in a covered container and reheat before serving.
Reheating
For make-ahead serving, reheat the refrigerated skulls in a 300°F oven for about 15 minutes.
I would heat them until warmed through rather than using excessive heat, which can make the crust harder.
This oven method is also the reheating method specified in the original recipe.
Freezing
The source says baked Pizza Skulls can be frozen for up to one month.
For best results, thaw them in the refrigerator before reheating, then warm them through in the oven.
A later author response on the source page also recommends making and baking the skulls before freezing them.
Why You’ll Love This Recipe?
These Pizza Skulls combine an easy pizza filling with a fun presentation. They are especially useful when you want party food that feels homemade without requiring complicated cooking techniques.
- Easy to Prepare: I can rely on ready-made pizza dough and jarred pizza sauce, which cuts down on preparation time while still giving me a homemade-looking appetizer.
- Perfect for Halloween: The skull shape instantly creates a spooky theme without needing complicated decorations. I can put them on a platter and have a Halloween-ready dish.
- Customizable: I can change the fillings depending on what my family or guests enjoy. Pepperoni, ham, pineapple, sausage, chicken, mushrooms, peppers, and other vegetables can all be used.
- Great for Parties: I can make several skulls at once using a multi-cavity pan. That makes the recipe practical for Halloween dinners, themed parties, or fun family meals.
- Make-Ahead Friendly: I can bake the skulls in advance, refrigerate them for up to three days, or freeze them for up to a month, making party preparation easier.
FAQs
How do I make Pizza Skulls without a skull pan?
The original source suggests cutting pizza dough into a skull shape and topping it with cheese and favorite pizza toppings if you do not have a skull pan. The result will not have the same 3-D molded shape, but it still creates a skull-themed pizza.
What kind of cheese is best for Pizza Skulls?
Freshly shredded mozzarella is recommended because pre-shredded cheese contains anti-caking agents that can affect how the cheese melts.
Can I use different Pizza Skull fillings?
Yes. I can use mini pepperoni, sausage, hamburger, chicken, ham, pineapple, mushrooms, peppers, onions, roasted red peppers, artichokes, or other favorite pizza ingredients.
How long do Pizza Skulls last in the refrigerator?
Baked Pizza Skulls can be refrigerated for up to 3 days. For a make-ahead meal or party, reheat them in a 300°F oven for about 15 minutes, until warmed through.
Can I freeze Pizza Skulls?
Yes. The source says they can be frozen for up to one month. I would thaw them in the refrigerator before reheating them in the oven.
Final Thoughts
These Easy Pizza Skulls turn familiar pizza ingredients into something much more memorable. I especially like that the recipe does not require complicated homemade fillings or advanced decorating skills the skull pan creates most of the effect.
If you’re researching how to make pizza skulls, looking for a pizza skull pan, or searching terms such as pizza skull bites, this recipe gives you a straightforward starting point. The biggest keys are fresh shredded mozzarella, controlled filling, properly sealed dough, thorough chilling, and careful baking.
For Halloween, a spooky movie night, or simply a fun family dinner, these stuffed Pizza Skulls bring together crisp baked dough, warm pizza sauce, gooey mozzarella, and customizable toppings in one playful package.