Easy Mummy Cake Pops Recipe for a Spooky Halloween Party Treat

I made this Mummy Cake Pops Recipe when I wanted a Halloween dessert that looked impressive without requiring complicated baking skills. I love that the recipe starts with a simple chocolate cake mix, so most of the hard work is already done. After mixing the cake with chocolate fudge frosting, I shaped everything into small cake balls and chilled them.
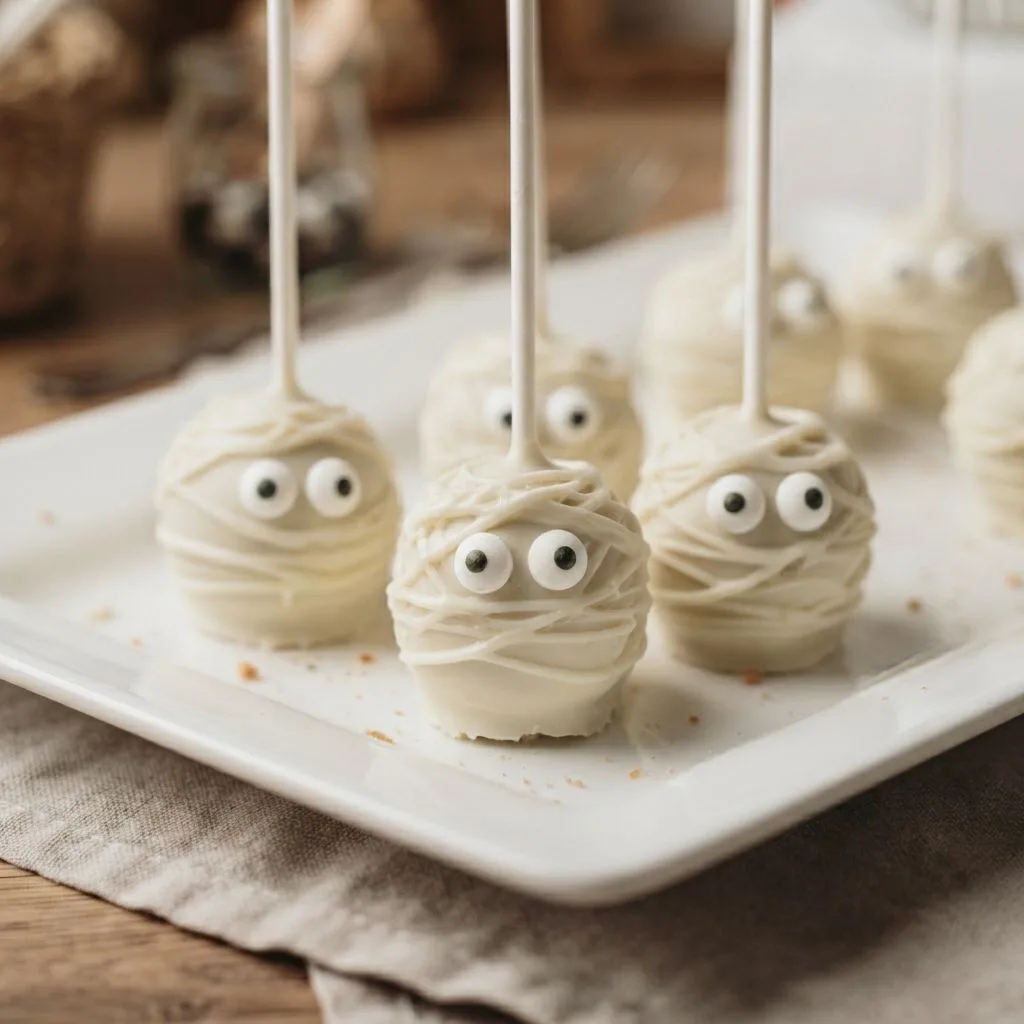
The almond bark gives each pop a smooth coating, while candy eyes and chocolate drizzles create the adorable mummy look. I found these cake pops especially fun to decorate, and they make a playful treat for a Halloween party or family dessert table.

Cooking Time
This recipe is designed to be fairly quick, especially because it uses a prepared cake mix and store-bought frosting.
- Prep Time: 15 minutes
- Cooking Time: 25 minutes
- Total Time: 55 minutes
- Freezing Time: 15 minutes
- Servings: About 24 cake pops
Ingredients
The ingredient list is short, which is one reason I find this recipe so convenient for Halloween baking.
- 1 box (15 oz) chocolate cake mix — Use your favorite brand and prepare it according to the package directions.
- Ingredients needed for the cake mix — Follow the amounts listed on your cake mix box.
- 1/3 cup chocolate fudge frosting — Store-bought frosting makes the cake mixture easy to combine.
- 1 package almond bark — It melts smoothly and creates the coating for the cake pops.
- Candy eyeballs — These give the finished cake pops their cute mummy faces.
- Lollipop sticks — Use these to turn the cake balls into easy-to-hold cake pops.
Note: serves several — This recipe makes approximately 24 cake pops, depending on how large you shape each one.
Equipment You Need
A few basic kitchen tools are enough to put these Halloween cake pops together.
- 9×13-inch baking pan — Use it to bake the chocolate cake according to the package instructions.
- Large mixing bowl — Gives you enough room to crumble and mix the cake with frosting.
- Cookie scoop — Helps me make cake balls that are similar in size.
- Parchment paper — Keeps the cake balls from sticking to the baking sheet.
- Microwave-safe bowl — Use it to melt the almond bark safely.
- Baking sheet — Holds the shaped cake balls while you work.
- Fork — Helps create the thin zigzag lines that look like mummy wrapping.
- Styrofoam block — Gives the coated cake pops somewhere to stand while they dry.
How to Make Mummy Cake Pops Recipe?
These cake pops come together in a few straightforward stages. First, bake and cool the cake, then turn it into a soft cake-and-frosting mixture. After chilling the shaped balls, coat and decorate them to create the mummy design.
Bake the Chocolate Cake
Prepare the chocolate cake mix according to the instructions printed on the box. Pour the batter into a 9×13-inch pan and bake it as directed.
Once baked, let the cake cool completely at room temperature. I recommend waiting until it is fully cool before moving on because warm cake can make the frosting mixture difficult to handle.
Crumble the Cooled Cake
Remove the cooled cake from the pan. I remove the outer layer of the cake before crumbling the remaining portion into a large bowl.
Break the cake into small crumbs. Try to make the pieces fairly fine so the frosting can distribute evenly throughout the mixture.
Add the Chocolate Frosting
Add 1/3 cup of chocolate fudge frosting to the crumbled cake. Stir the two ingredients together until the frosting is incorporated throughout.
The goal is a mixture that holds together well enough to shape into balls. I find that taking time to mix thoroughly helps create more consistent cake pops.
Shape the Cake Balls
Shape the cake mixture into approximately 24 to 36 round balls, depending on the size you prefer. Place each one on a baking sheet lined with parchment paper.
I like using a cookie scoop to keep the portions similar. Evenly sized cake balls also make the finished platter look more polished.
Melt the Almond Bark
Chop the almond bark into smaller pieces and place it in a microwave-safe bowl. Heat it for 30 seconds, then stir thoroughly.
Continue heating in 30-second intervals, stirring after each interval, until the almond bark is completely melted and creamy. If it becomes too thick, a small amount of vegetable oil or coconut oil can be gradually mixed in.
Add the Lollipop Sticks
Dip the end of each lollipop stick into the melted almond bark. Insert the coated end into the center of a cake ball, going about halfway into the ball.
Once the sticks are inserted, place the cake pops in the freezer for 10 to 15 minutes. I would not freeze them longer than 15 minutes, as the original recipe specifically recommends keeping the chilling period short.
Coat the Cake Pops
After chilling, dip each cake pop into the melted almond bark. Make sure the cake is covered completely, then allow the extra coating to drip back into the bowl.
Place the sticks into a Styrofoam block so the cake pops can remain upright while the coating sets. If the almond bark has become firm, gently reheat it before continuing.
Add the Mummy Eyes
While the almond bark is still soft, place the candy eyeballs onto each cake pop. The eyes need to be added before the coating completely hardens so they stay attached.
Continue coating the cake pops and adding the eyes until all of them are decorated.
Create the Mummy Wrapping
Once the coating has dried, use any remaining melted almond bark to create the mummy effect. Reheat the almond bark if necessary so it is fluid enough to drizzle.
Hold a cake pop and use a fork to drizzle the almond bark back and forth across it in irregular zigzag lines. These lines create the appearance of mummy wrappings.
Let Them Set
Allow the decorated cake pops to finish setting at room temperature. Once the coating and decorative drizzle have hardened, they are ready to serve.
I like giving the finished cake pops a final look before serving to make sure the mummy lines and candy eyes are secure.
Additional Tips for Making This Recipe Better
After making this style of cake pop, I would keep a few practical tricks in mind:
- I chill the cake pops before dipping them. The 10-to-15-minute freezer step makes the balls easier to coat.
- I melt the almond bark gradually. Thirty-second microwave intervals help prevent the coating from becoming overheated.
- I thin thick almond bark slowly. I add a small amount of vegetable or coconut oil only when the coating needs a smoother consistency.
- I let excess coating drip away. This helps prevent a heavy layer of almond bark from collecting around the cake pop.
- I add the eyes immediately. I place the candy eyeballs on while the coating is still soft.
- I use a cookie scoop. This makes the cake balls more uniform and gives the finished batch a neat appearance.
- I prepare some of the work ahead. I can combine the cake and frosting, shape the balls, and refrigerate them overnight before coating them the next day.
Common Mistakes to Avoid
These small details can make the cake pops easier to handle.
- Using warm cake: I always let the cake cool completely before mixing it with frosting.
- Over-freezing the cake pops: I keep the freezer time to 10–15 minutes rather than leaving them frozen for longer.
- Making the coating too thick: If I find the almond bark difficult to dip, I gradually thin it with a little vegetable or coconut oil.
- Adding the eyes too late: I put the candy eyes on while the coating is still wet so they stick properly.
- Making uneven cake balls: I use a cookie scoop to help keep the portions consistent.
How to Serve Mummy Cake Pops?
I like serving these cake pops as individual Halloween desserts because the lollipop sticks make them easy for guests to pick up without plates or forks.
For presentation, arrange the finished mummy cake pops upright on a platter or display them together so the candy eyes and zigzag wrapping are easy to see. A simple Halloween dessert table can make the cake pops the playful centerpiece.
You can also vary the size slightly for a homemade appearance, although keeping most of the cake pops similar in size creates a more uniform presentation.

Variations
The original recipe gives several simple ways to change the flavor or coating:
- White chocolate version: Replace the almond bark with white chocolate for a different coating option.
- Candy melts: Use candy melts instead of almond bark when you prefer them.
- Vanilla version: Replace the chocolate cake and chocolate fudge frosting with vanilla cake and vanilla frosting.
- Pastry-bag decoration: Instead of using a fork, a pastry bag can be used to create the mummy-style drizzled wrapping.
These options let me change the flavor and decoration without changing the basic cake-pop method.
Nutritional Information
The source recipe lists the following nutrition per serving:
- Calories: 246 kcal
- Protein: 1 g
- Carbohydrates: 32 g
- Fat: 12 g
These figures are based on the recipe as provided and may vary depending on the specific cake mix, frosting, and decorating ingredients used.
Make Ahead and Storage
Make Ahead
I can prepare the cake-and-frosting mixture in advance, shape it into cake balls, and keep the balls refrigerated overnight.
The next day, I can continue with the almond bark coating and decoration. This makes the recipe useful when I want to spread Halloween party preparation over two days.
Storage
Store finished Mummy Cake Pops in an airtight container at room temperature. The original recipe states that they can remain fresh for up to one week when stored this way.
I would keep the container sealed between servings to help protect the cake pops from drying out.
Freezing
The recipe uses the freezer briefly during preparation rather than as a long-term storage method. The shaped cake pops are chilled for 10 to 15 minutes before dipping.
I would follow that short freezing period rather than extending it, since the source specifically advises not to freeze the cake pops for more than 15 minutes at that stage.
Reheating
The almond bark can be reheated if it becomes firm while you are decorating. I use short 30-second microwave intervals and stir between each interval.
This is especially useful when making a larger batch because the coating can begin to set while you are working.
Why You’ll Love This Recipe?
There are several reasons these Mummy Cake Pops are such a fun Halloween baking project.
- Easy preparation: I love that the recipe starts with a boxed cake mix and prepared frosting. That keeps the process simple without requiring a homemade cake or frosting recipe.
- Only a handful of main ingredients: The cake mix, frosting, almond bark, candy eyes, and sticks create the basic recipe. I can focus more on decorating than measuring lots of ingredients.
- Fun Halloween appearance: The candy eyes and zigzag almond bark make the finished treats instantly recognizable as little mummies. They are especially playful for a Halloween dessert spread.
- Make-ahead friendly: I can prepare the cake-and-frosting balls ahead of time and refrigerate them overnight. That gives me less decorating work to handle on the day of a gathering.
- Easy to customize: I can switch chocolate for vanilla, or use white chocolate or candy melts instead of almond bark. This gives me several ways to change the finished dessert while keeping the same basic technique.
FAQs
Can I use vanilla cake instead of chocolate cake?
Yes. The source recipe specifically suggests replacing the chocolate cake and chocolate fudge frosting with vanilla cake and vanilla frosting.
How long should Mummy Cake Pops stay in the freezer?
The cake pops should be chilled for 10 to 15 minutes before dipping. I would not leave them in the freezer for more than 15 minutes during this step.
What can I use instead of almond bark?
White chocolate or candy melts can be used as alternatives to almond bark. The source also suggests using a pastry bag for creating the mummy decoration.
How do I thin melted almond bark?
If the melted almond bark is too thick for dipping, gradually add a small amount of vegetable oil or coconut oil until the coating reaches a smoother consistency.
How long do Mummy Cake Pops last?
Store the finished cake pops in an airtight container at room temperature for up to one week, according to the original recipe.
Final Thoughts
I love how these Mummy Cake Pops turn a very simple cake mixture into a fun Halloween dessert. The combination of chocolate cake, fudge frosting, smooth almond bark, candy eyes, and irregular mummy wrapping makes them both easy and eye-catching.
The best part for me is that the recipe leaves plenty of room for creativity without making the basic process complicated. Whether I make chocolate or vanilla versions, these little cake pops are an easy way to add a playful homemade touch to a Halloween celebration.